Gnuk is a free software implementation of a USB-based OpenPGP cryptographic token, from the Free Software Initiative of Japan. Best of all, it supports Ed25519! Check out the Gnuk documentation for additional information. In this post we’ll look into how we can run Gnuk on an ST-LINK v2, using another ST-LINK to program it.
About the ST-LINK v2
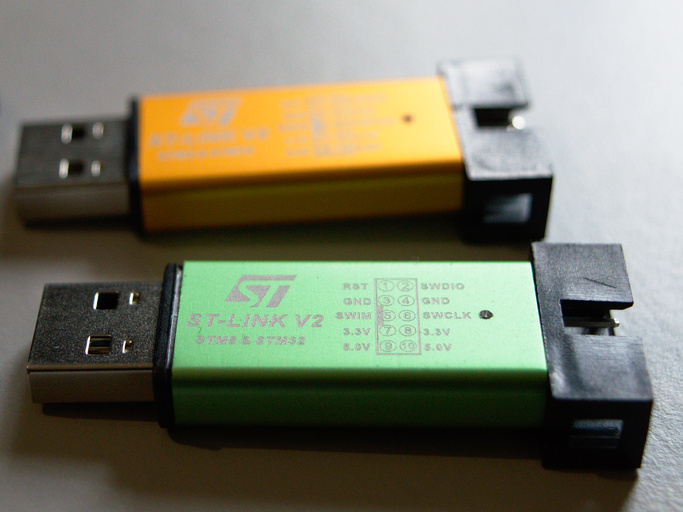
The ST-LINK v2 is meant as a utility device to program/debug STM8 and STM32 chips. It is based on the STM32F101 and can be reprogrammed fairly easily. Not only that, they are dirt cheap: you can find them for less than $2 on AliExpress. Just keep in mind that you’ll need to keep one around in order to be able to (re)program your Gnuk. Order a couple, especially if you want a particular color. ;)
Building Gnuk
In order to build the Gnuk firmware, you’ll need a working ARM crosscompiler.
| Distro | Packages |
|---|---|
| Arch | arm-none-eabi-gcc arm-none-eabi-newlib |
| Debian/Ubuntu | gcc-arm-none-eabi |
| Gentoo | crossdev -t arm-none-eabi -s4 (?) |
Building is quite easy:
git clone git://git.gniibe.org/gnuk/gnuk.git
cd gnuk/
git submodule update --init
cd src/
./configure --vidpid=234b:0000 --target=ST_DONGLE
make build/gnuk-vidpid.bin
cd ..
Note that the target option also supports various other devices.
Connecting the ST-LINK
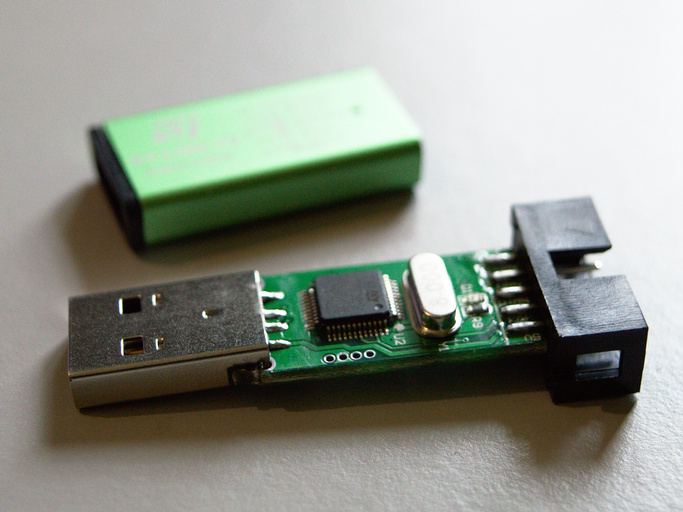
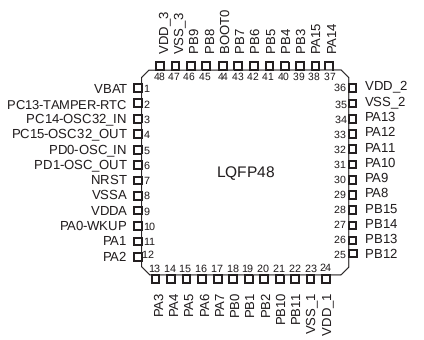
Remove the case of the device you want to program by simply pulling it off. Locate the four connection points next to the STM32. The layout is (starting near the USB connector):
- SWDIO
- GND
- SWCLK
- 3.3v
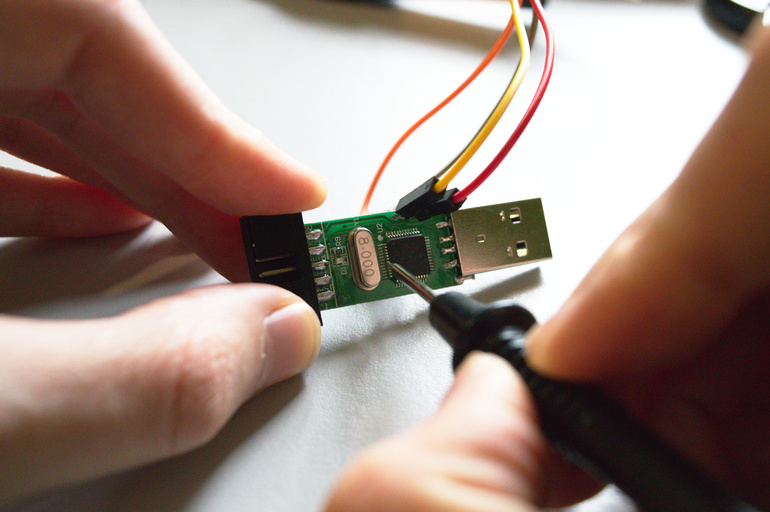
The second ST-LINK will be used as programmer. Connect the pins located at the end of the ST-LINK to the device you want to program. The pin layout is written on the case; it is easiest to just use pins 2, 4, 6, and 8.
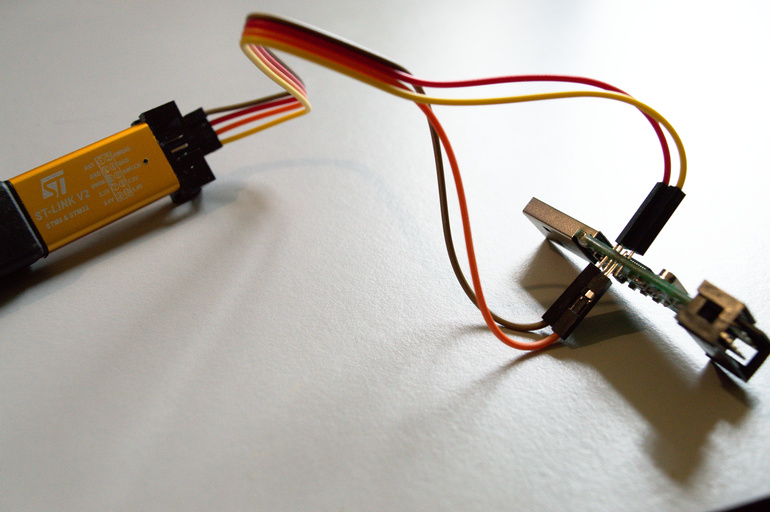
Now connect the second device to your computer via USB and you’re ready to start programming.
Flashing using openocd
The OpenOCD (Open On-Chip Debugger) tool can be used to interact with the
ST-LINK programmer.
First, create openocd.cfg in your working directory containing the following:
telnet_port 4444
source [find interface/stlink-v2.cfg]
source [find target/stm32f1x.cfg]
set WORKAREASIZE 0x10000
Next run openocd. To actually interact with OpenOCD you will need to
connect to the process via telnet using e.g. telnet localhost 4444.
Inside OpenOCD, run:
stm32f1x unlock 0
reset halt
flash write_bank 0 ./src/build/gnuk-vidpid.bin 0
stm32f1x lock 0
reset halt
If the device was already flashed before, you may need to issue mass_erase
first (see below on how to reset the ST-LINK).
Note that the lock command enables read-out protection and is important for
security.
Disabling this lock will erase the flash.
Keep in mind that the device itself is not made to be tamper resistant,
so YMMV.
TODO: try out the stlinkv2.py script that comes with Gnuk instead.
Using the Gnuk key
Now that you’ve created your Gnuk key, you can put the case back on and
connect it to your computer.
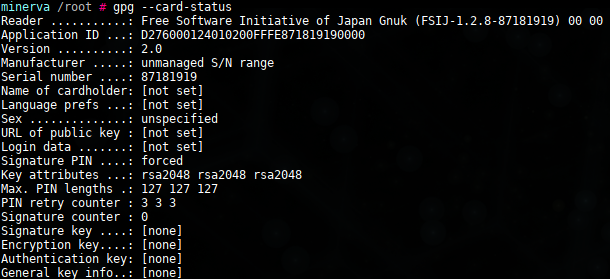
Run gpg --card-status and you should be greeted with a working
OpenPGP-compatible card!
To get it to work you should install scdaemon, which sometimes comes with
GnuPG depending on your distro.
Installing pcscd is the easiest way to allow unprivileged users to access the
Gnuk token.
Run gpg --card-edit, and enter admin followed by passwd to change the
default PIN codes (123456 for the user PIN and 12345678 for the admin PIN).
Also check out
the Arch wiki and
Merlijn’s GPG instructions for more
information on how to set up your card.
Oops, I messed up
Reprogramming the ST-LINK is slightly more difficult, but may be required when:
- Trying a different version of Gnuk
- Somehow flashed incorrectly
- You’ve entered the wrong PIN too many times
Note that reprograming will mean wiping the flash memory. You’ll lose all key material that was on the device, but that’s a good thing.
To reprogram the ST-LINK, connect the device to the programmer as before. Keep pins 7 (NRST) and 8 (VSSA) shorted (see diagram). While they are shorted, the LED will blink – if it’s blinking very rapidly you’re shorting the wrong pins. While the LED is blinking, run openocd. Once it’s running (i.e. it doesn’t show any errors and isn’t attempting to reconnect), you can unshort the pins.
You can now connect to openocd using telnet and reprogram:
reset halt
stm32f1x unlock 0
reset halt
stm32f1x mass_erase 0
flash write_bank 0 ./src/build/gnuk-vidpid.bin 0
stm32f1x lock 0
reset halt
References
- https://www.fsij.org/category/gnuk.html
- https://blog.danman.eu/2-usb-crypto-token-for-use-with-gpg-and-ssh/
- https://wizzup.org/workshop.html
TODO
- Try out the factory reset functionality.
- It would be really nice to have a 3D printable case with an integrated button.